sobota, 31 października 2020

ELEGANCKA KARTKA NA ŚLUB- TUTORIAL

 Witajcie.

 Na dziś przygotowałam  prosty kurs na elegancką  kartkę ślubną. Powstała z delikatnych papierów bazowych Basic Paper Set #3- Craft O'Clock w połączeniu z papierem wizytówkowym i złotym kartonem. 


Potrzebne będą wybrane arkusze zestawu bazowego,

biały papier wizytówkowy Linen A4,

 złoty karton lustrzany, 

pionowa baza A6,

 ozdobna ramka,

 wykrojnik pary młodej,

 stempel W dniu ślubu,

 brązowy tusz  i oczywiście klej , nożyczki oraz kostki dystansowe.

 Przyda się również maszynka wycinająca i trymer bądź gilotyna.

Wszystkie materiały znajdziecie w sklepie Zielone Koty.

1. Przygotuj 1 większą ramkę oraz 2 mniejsze wycinając je maszynką wycinającą z papierów bazowych oraz złotego kartonu. 


2. Z papieru wizytówkowego i złotego kartonu wytnij  parę młodą.


3. Nałóż na siebie i sklej z niewielkim przesunięciem mniejsze ramki. Podobnie postępuj z wykrojnikiem pary młodej.

4. Za pomocą kostek dystansowych nałóż warstwowo poszczególne elementy.


5. Brązowym tuszem nanieś stempel na fragment wzorzystego papieru, przytnij do odpowiedniej wielkości i przymocuj kostkami w dolnej części pracy.


6. Pionową bazę przytnij do wymiarów 8,5 x 13,5cm i połącz z całością, tak aby była niewidoczna z przodu. 


Mamy to! Piękna sama w sobie bez zbędnych dodatków. Idealna jako dodatek do prezentu ślubnego.
Pozdrawiam
Bożena/BBart

Link do materiałów na blogu Zielone Koty.


środa, 28 października 2020

Tag z kwiatami


Hi friends.
Time for another inspiration for 


Other Products: Watercolor paints, Cutting machine, twine

Instructions: Cut out tags from the patterned paper from the Home on the Farm paper collection using the Ticket and Tags dies. On white Deluxe Flower Shaping Paper, stamp the selected elements using Jet Black Archival ink. Paint with watercolor paints, cut out with matching dies. Layer the composition as shown. Put a little glue on the flowers and sprinkle with crystal clear glitter.

Make a hole in the upper part and thread the twine.

 Thank you for stopping by my blog today! I hope you like my creation.

Don't forget to visit Heartfelt Creation blog for instruction,
where you can find beautiful papers, dies,stamps and much much more.

Bożena//BBart

poniedziałek, 26 października 2020

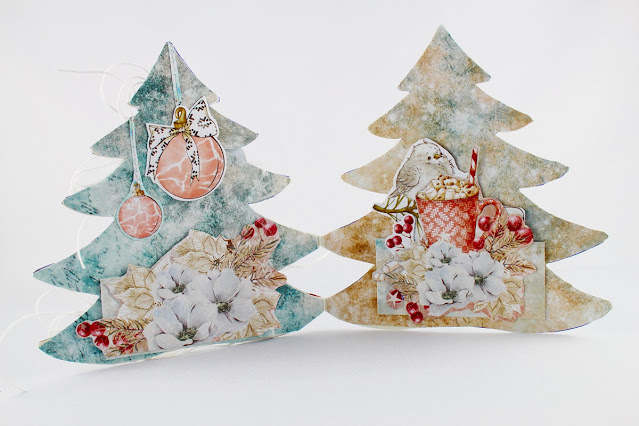
ŚWIĄTECZNA KARTKA W KSZTAŁCIE CHOINKI

 4 KATALOG INSPIRACYJNY SKLEPU CRAFT O'CLOCK JUŻ DOSTĘPNY ONLINE. ZNAJDZIECIE W NIM PRZEGLĄD PIĘKNYCH KOLEKCJI ZIMOWYCH. ZAPRASZAM RÓWNIEŻ NA MOJĄ INSPIRACJĘ.

Przygotowałam kartkę w kształcie choinki ozdobioną papierami oraz elementami do wycinania  kolekcji Frosty Sparking.


Link do obejrzenia i pobrania katalogu:

https://www.yumpu.com/xx/document/view/64641084/katalog-inspiracyjny-4-2020

przegląd kolekcji- TUTAJ


niedziela, 25 października 2020

Zawieszki do prezentu- tutorial


Witajcie.
 Piękna, zimowa kolekcja Frosty Sparking zainspirowała mnie do stworzenia prostych zawieszek na papierze kraftowym w kształcie koła. Świetnie nadadzą się jako dodatek do prezentów świątecznych lub jako dekoracja. Wszystko zależy od waszej kreatywności.
Zapraszam na tutorial.


1. Przygotuj potrzebne materiały:

-kolekcja FROSTY SPARKING -zestaw 20x20
-arkusz dodatków do wycięcia I
-arkusz dodatków do wycięcia KWIATKI 22
-karton kraft
-klej ,nożyczki, kostki 3d
-gaza, sznurek
-wykrojniki kółko, falbanka, dziurkacz


2.  Wytnij kółka oraz wybrane  elementy z arkusza do wycinania 1 oraz arkusza kwiatki 22.


3. Połącz  falbankę z kółkiem. Poczekaj aż wyschnie. Przed nałożeniem kompozycji w każdej zawieszce wykonaj  otwór dziurkaczem.


4.  Na warstwie kleju rozłóż kawałek gazy, na nią warstwowo układaj wybrane elementy. Bardzo pomocne będą kostki 3d.  


5.Zawiąż sznurek w podwójną kokardkę. Połącz kokardkę z zawieszką przeciągając dodatkowy kawałek sznurka przez otwór. Zakończ supełkiem.


 I gotowe. Proste a zarazem efektowne. Idealne dla maluchów oraz dorosłych. 
Mam nadzieję ,że  zainspirowałam Was do stworzenia własnych. 


Przegląd kolekcji znajdziecie TUTAJ.
Pozdrawiam Bożena /BBart

środa, 21 października 2020

NA FARMIE


Hi friends.
Time for another inspiration for 


Other Products: Watercolor paints, Cutting machine, twine

Instructions: Cut out tags from the patterned paper from the Home on the Farm collection. On white cardstock, stamp the selected elements, use black ink. Paint with watercolor paints, cut with a matching die. Layer the composition as shown. Glue the tree on top in the middle, place a fence on the foam cubes, glue the grass at the very bottom. Place a picture of horses in the center, use foam cubes.

Make a hole in the upper part and thread the twine.

Thank you for stopping by my blog today! I hope you like my creation.
Don't forget to visit Heartfelt Creation blog for instruction,
where you can find beautiful papers, dies,stamps and much much more.

Bożena//BBart


środa, 14 października 2020

Kartka ze słonecznikami


Hi friends.

 Today's the day Home on the Farm Collection becomes available to everyone.

The Home On The Farm collection gives you the ability and pieces needed to create beautiful farm life scenes, complete with a large barn, cute and cuddly farm animals, and a variety of wild flowers! Perfect for setting the scene and feel of a life out in the country, and on the farm! 

I invite you take some time and be inspired by the elegant  card
 featured below for special occasions.


Other Products: Cutting machine, scissors, Watercolor paints

Instructions: Prepare a unique layered 4 1/4 x 5 1/2” card for yourself or your friends. Use stamps and dies from the Home on the Farm collection. Cut out the image from sheet 9A. Additionally, cut its center with a rectangular die for a layered composition. Place everything on the slightly larger rectangle cut from sheet 12B. Stamp the selected items on white cardstock, use black ink. Cut with the coordinating dies from the set. Paint with watercolor paints. Place in layers as shown using 3d cubes.

Place everything on a double white cardstock base.

Thank you for stopping by my blog today! I hope you like my creation.
Don't forget to visit Heartfelt Creation blog for instruction,
where you can find beautiful papers, dies,stamps and much much more.

Bożena//BBart


środa, 7 października 2020

TOREBKA URODZINOWA

Hi friends.
Time for another inspiration for 


Other Products: Ribbon, Cutting machine, white paper 120g

Instructions: Prepare a paper bag with an accordion fold at the top. Use a plain A4 sheet. You can find preparation instructions on the web. Wrap a ribbon around and tie a bow. Stamp the sentiment using Vibrant Fuchsia ink on Deluxe Flower Shaping Paper and diecut using coordinating die. Diecut the mat layer from Luxe gold cardstock and adhere together.

Attach the sentiment in the middle with 3d cubes. Paper gift bag is now ready.


Thank you for stopping by my blog today! I hope you like my creation.
Don't forget to visit Heartfelt Creation blog for instruction,
where you can find beautiful papers, dies,stamps and much much more.

Bożena//BBart