Pokazywanie postów oznaczonych etykietą dla Babci i Dziadka. Pokaż wszystkie posty

środa, 31 grudnia 2025

Koronkowe serduszko

Moja ostatnia inspiracja dla Artianette to 

warstwowe  serduszko z koronkowym wykończeniem,

 w której wykorzystałam tło oraz pojedyńcze grafiki kolekcji Cozy Winter.

 W formie zawieszki, może stać się wspaniałą niespodzianką dla dziadków 

z okazji ich zbliżającego się święta.


Pozdrawiam twórczo.
Bożena/ BBart


czwartek, 25 grudnia 2025

Zimowa kula dla Babci i Dziadka

 Moja dzisiejsza inspiracja dla Artianette 

to zimowa kula dla babci i dziadka, 

w której wykorzystałam grafiki i tła z kolekcji Cozy Winter.


Dziękuję za odwiedziny.

Pozdrawiam twórczo.

Bożena/ BBart

poniedziałek, 8 grudnia 2025

Zimowe zakładki dla Niej i dla Niego

 Witajcie,

 przez cały grudzień mam przyjemność projektować gościnnie dla Artianette.

Moja pierwsza inspiracja to zimowe zakładki dla niej i dla niego.

Wykorzystałam tła i grafiki kolekcji Cozy Winter.


poniedziałek, 16 czerwca 2025

Kartka - podziękowanie w formie księgi

 Elegancka księga do kompletu z pudełkiem przewiązanym wstążką.

Piękne podziękowanie z okazji przejścia na emeryturę.


Pozdrawiam twórczo.
Bożena/ BBart

niedziela, 21 sierpnia 2022

czwartek, 21 lipca 2022

piątek, 24 czerwca 2022

Heartfelt Creations June 2022 Alumni Blog Hop

 Hello Friends!

Welcome to my blog for the Heartfelt Creations June Alumni Blog Hop!


The hop begins at 8AM EDT on Friday, June 24th,2022 and runs until 11:55PM EDT on Monday, June 27th, 2022.
    At that time a randomly chosen comment from a mystery blog will be chosen to win a $25 Heartfelt Creations Gift Card.


Heartfelt Creations will be giving away a second $25 gift card chosen randomly from the comments left on their blog. Be sure to check to see if you are one of the lucky winners!

The winners will be announced on the Heartfelt Creations blog and Facebook page on Wednesday, June 29th. The winner has 72 hours to claim the prize by emailing socialmedia@heartfeltcreations.us. Please write Winner of the June
Alumni Blog Hop in the subject line. 
 
Have fun hopping!


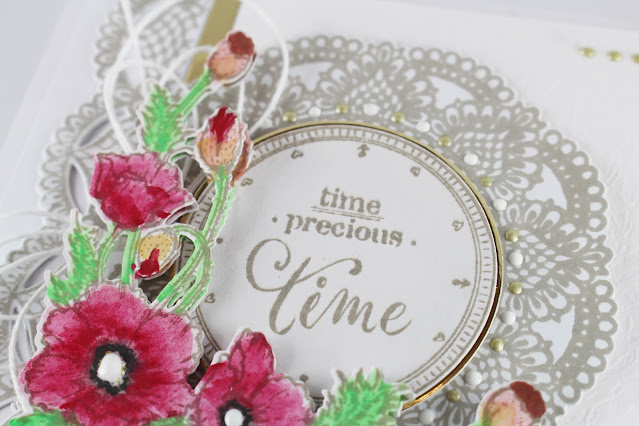
Today I am sharing with you an elegant card in which I used a wonderful mosaic and beautiful poppies from the Wild Poppy collection.
 Below is a description of the execution and a detailed list of materials.


-Prepare the base of white cardboard by cutting out a rectangle of the size of 10.5 '' x 5.25 ''. Then fold in half.
-From the cardboard with a leather texture, trim a 2.5 '' x 5 '' belt
From plain white cardboard, trim a 1.25 '' x 5 '' strip
Attach to the base as shown.
-Using Pebble Beach ink, mirror the mosaic image from the Elegant Mosaics Cling Stamp Set, then cut out with the matching matrix.
-Using the same ink, copy the selected image from the Timepiece Sentiments Cling Stamp Set, then cut out with the selected matching circle from the Simple Moments Timepiece Die set.
- Using the selected circle from the Circle Basics Large Die set, cut out a slightly larger circle in the gold cardboard than the previous one. Paste the motif with it and place it in the central part of the mosaic.
Also, cut a thin strip of 0.25 '' x 5 '' from the gold cardboard.
Place it on the joint as shown next to the decorative border.
- Mirror the selected image 2x from the Wild Poppy Accents Cling Stamp Set and cut with a matching matrix. Paint with watercolor paints. Apply one on top of the other using the 3d foam strips.
In the center of 2 flowers, add spots of Nuvo's white droplets.
-Create your composition as shown. Attach a string on the left side.
-Around the mosaic, add alternating white and gold Nuvo droplets. In the upper part, fill the composition with golden droplets. 
And it's ready!


Thanks for visiting and taking your time to comment on my blog!


Your next stop in the blog hop is: CANDY 

  She’ll have the link to the  next blog in the hop. 
 But I’ve provided a full list below just in case you get lost.


Kathy Clement- Kathy by Design

Amarilys Doria- Amarilys’s Creations

Alissa Wells- Will Run for Stamps

Gloria Stengel- Scraps of Life

Lynn Stanborough- What the Heart Wants

Bozena - BBartCards (YOU ARE HERE )

Candy Slabaugh- Candy’s Creations

Monica Edwards- Simply Monica

Lisa Gregory- What a Beautiful Mess

Oksana Clegg- Everyday Crafting

Vicki Dutcher- All I Do Is Stamp

Heartfelt Creations- Heartfelt Creations Blog


---You’ll find a linked supply list below this post---


Regards Bożena/ BBart Cards

środa, 11 maja 2022

Kartka z bukietem maków

 Dziś debiut najnowszej kolekcji Heartfelt Creations Wild Poppy

 z pięknymi makami w roli głównej.

Mój projekt to kompozycja maków z sercem.


Dziękuję za odwiedziny i pozostawione słowo.

Zapraszam ponownie.

Bożena/BBart


sobota, 7 maja 2022

sobota, 30 kwietnia 2022

środa, 30 marca 2022

BEST WISHES


Dziś na blogu  Heartfelt Creations kolejna inspiracja w moim wykonaniu.

Szczegóły dotyczące projektu znajdziecie w galerii HC.

Zapraszam.


Dziękuję za odwiedziny i zapraszam ponownie.

Bożena/BBart


środa, 23 marca 2022

Delikatna różana kartka

 Dziś na blogu Heartfelt Creations znajdziecie kolejną różaną kartkę w moim wykonaniu.

Po opis wykonania i szczegółową listę materiałów zapraszam TUTAJ. 


środa, 16 marca 2022

ELEGANCKO Z RÓŻAMI


Dziś na blogu Hearfelt Creations prosta kartka z różami.

Szczegóły dotyczące mojej pracy znajdziecie w galerii HC.

Zapraszam.


Dziękuję za odwiedziny i zapraszam ponownie.

Bożena/BBart


środa, 5 maja 2021

Kartka z malowanym bukietem

 Hi friends.

Time for another inspiration for 


Other Products: Cutting machine, watercolor paint, brush, scissors, ruler, recycled cardboard

Instructions: From Sweet Magnolia Sheet 12B HCDP1-2126, cut out HCD2-7191 Intricate Swirl Frames. Cut another part of the frame from sheet 5A of this collection. Adhere with transparent glue. From the same 5A sheet, cut an oval straight frame from the HCD1-776 Eyelet Oval. Draw its oval shape on sheet 11B and cut it out with scissors. Pull the edges with one of the scissors' arms to age the paper. Apply glue to the oval shapes and glue them together.

On the white cardstock HCPP1-438-2, stamp the bouquet image from the HCPC-3950 Sweet Magnolia Bouquet set. Use Pebble Beach ink. Cut with a matching die. Then paint with watercolor paints. After drying, place the bouquet in the center on a layer of recycled cardboard.

Create the foundation. Fold the white cardstock in half, measure 3.75 x 5.75 '', cut with a guillotine or a paper trimmer. Glue on the back so that it is invisible.


Thank you for stopping by my blog today! I hope you like my creation.

Don't forget to visit Heartfelt Creation blog for instruction,
where you can find beautiful papers, dies,stamps and much much more.

Bożena//BBart